Please temporarily pause or whitelist us to create an account
If you opened our link from an app, look for 3 dots on the top right to open our page in your browser. We don't display ads nor sell/share your data, but our website requires Javascript to work properly. Thanks! -Team Graydient
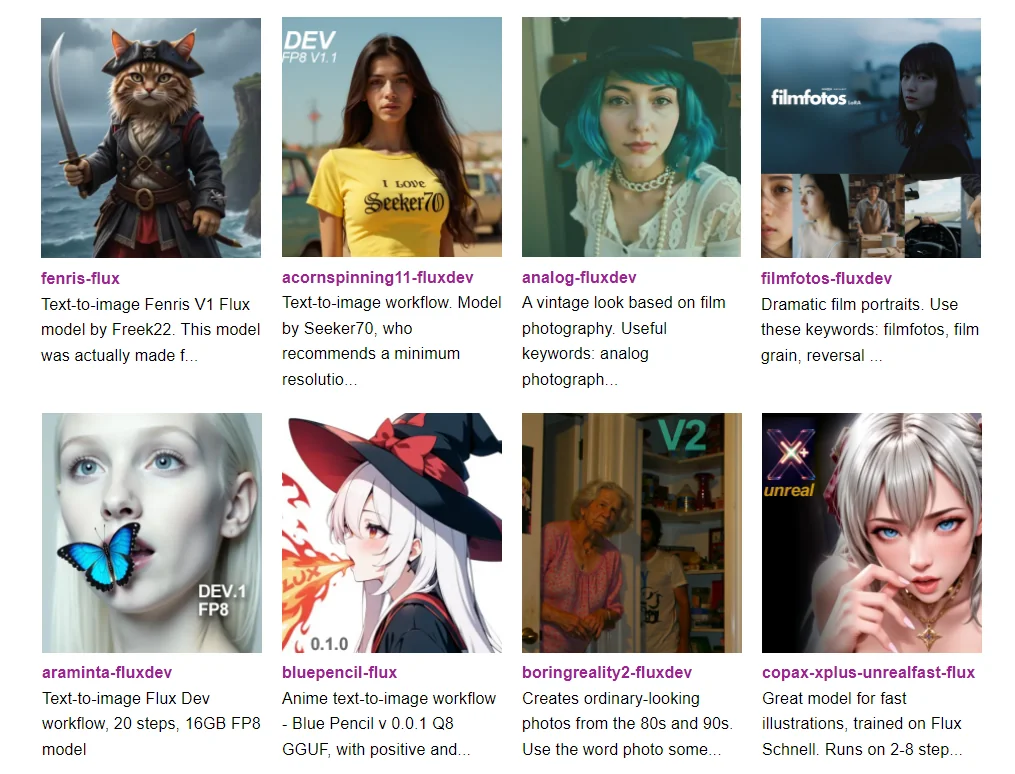
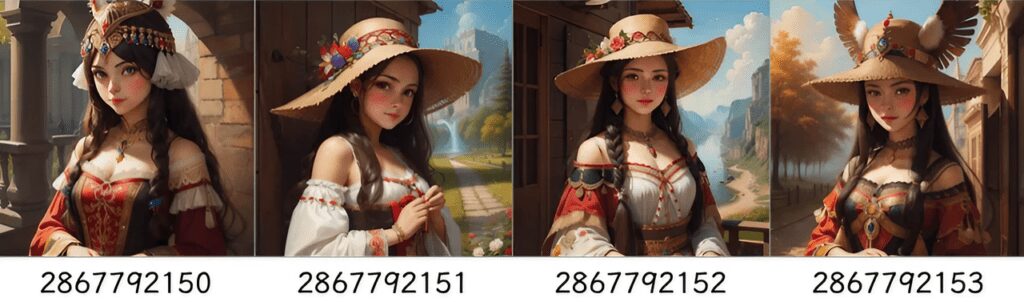
Unified Web Editor (formerly Stable2go) is Graydient’s original WebUI for creating AI images, preloaded with popular open source AI models from our community. Unlike other services, there are no “tokens” or “credits” required. Like all Graydient tools, Unified is designed for unlimited use, royalty free. We changed the name as we now support many families of models, like Flux2, Chroma, Wan, HunYuan, SDXL, and more. Over 25,000 models come preinstalled, no setup.
Prompting is easy with Skills
Skills write detailed prompts for you. Simply write the gist of what you want to see, and click Generate. You can tweak the command before it goes to the server. Then click Render. That’s it! Our AI will automatically chose the best workflow for your request. Use words like ‘video’ or ‘anime’ to guide it to the correct workflow.
We’ve added a new Workflows feature that allows powerful easy creation! You can find them under the “tasks” menu, right under the image upload button and negative prompt.
VIDEO WORKFLOWS
We support text-to-video, as well as image-to-video.
For example, you can turn a photograph into a video. Here’s how:
Click on the Unified Editor
Click on Tasks > Workflows and choose Animate-SkyReels (this is the latest, there are others)
Upload your photo where it says “Initial Photo” under the prompt box
And type your prompt. The videos generate in less than 2 minutes
There are also TEXT-TO-VIDEO workflows that don’t need a photo.
You can choose from LTX and HUNYUAN video workflows and add concepts from the community-created HunYuan Lora library.
IMAGE WORKFLOWS
It works the same way as video – just click on the workflows area and start creating. For example, learn how to make a seamless repeating pattern with AI. This is just one of the many workflows in the system.
Workflows are designed for beginners
Try workflows today – start with a simple prompt and queue up 2 images at a time at 1024×1024.
The concepts system is designed for pros
Instead of starting with a workflow, you can start from scratch. This is a bit of a rabbit hole as you’ll need a full understanding of how the concepts system works to get exactly what you want. This is more technical, but yields more power and control. We recommend starting by editing popular prompts in the Inspiration section in your My.Graydient dashboard.
Over 10,000 models preloaded, no boot time
Every week we install new models — the concepts system is full of original trained models from our community and from all over the web.
A prompt is a complete description that tells the AI what image to generate:
Should it be realistic? A type of artwork?
Describe the time of day, point of view and lighting
Describe the subject well and their actions
Describe the location last, and other details
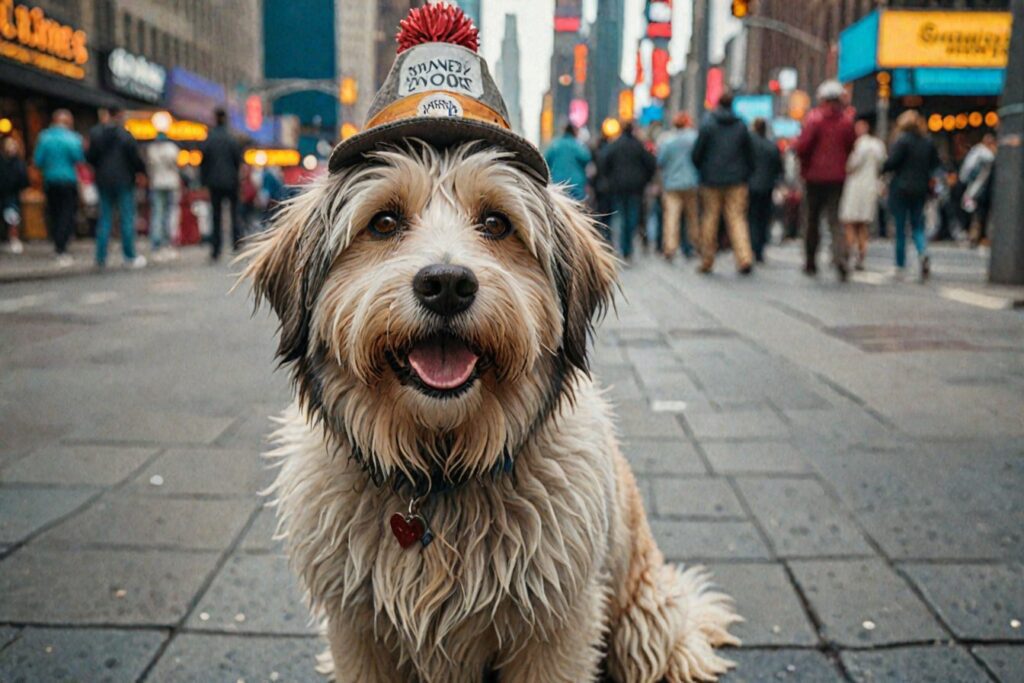
Basic Example:
A cinematic realistic photograph of a shaggy dog looking at the viewer, wearing a silly hat, sidewalk view, downtown New York, Times Square, happy, bokeh background, depth of field, high quality, film grain
You can do so much more with Stable2go. Read on!
Quick Prompt Tips
1. Always describe the whole picture, every time
A prompt is not a chat message, meaning it is not a multi-turn conversation. Each prompt is a brand new turn at the system, forgetting everything that was typed the previous turn. For example, if we prompt “a dog in a costume”, we will certainly get it. This prompt completely describes a photo.If we only prompt “make it red” (incomplete idea) we won’t see the dog at all because “it” was not carried over, so the prompt will be misunderstood. Always present the full instruction.
2. The word order matters
Place the most important words at the start of the prompt. If you’re creating a portrait, place the person’s appearance first and what they are wearing, followed by what and where they are as the least important details.
3. Length also matters
The words at the start are the most important, and each word towards the end gets less and less attention – up to roughly 77 “tokens” or instructions. However, you should know that each AI concept in our system is trained on different subject matter, so choosing the right concept will impact how well you are understood. It’s best to keep things to the point and learn the concepts system below) instead of writing long prompts for the highest quality results.
Positive Prompts
Positive prompts and Negative prompts are words that tell the AI about what we do and don’t want to see. Humans don’t typically communicate in such a binary form, but in a very noisy environment we might say “this, but that!”
Positive: A daytime beach scene with a clear blue sand, palm trees Negative: People, Boats, Bikinis, NSFW
This entered in the two boxes of the Stable2go editor, like this:
Positive prompts contain the subject and supporting details of the image. It helps to describe the art style and surroundings, as well as your expectations of aesthetics. Examples:
best quality realistic photo of a puppy
masterpiece drawing of a sunflower, bokeh background
low angle photo of a scooter in a driveway, watercolors
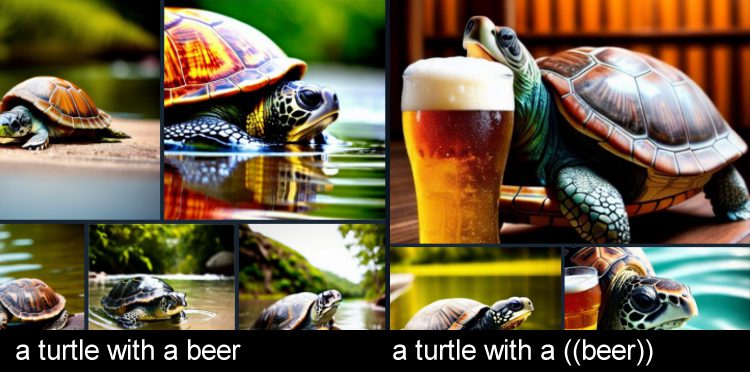
/translate una tortuga con una cerveza*
a turtle with a ((beer))
*Tip: You can prompt 50 languages! Simply start the prompt with /translate (limitations)
Making positives more powerful
To add more emphasis to certain words, add nested parenthesis. This increases their factor by 1.1x.
In the example above, we are saying that “turtle” is the subject, because it appears at the start of the prompt, but the beer is just as important even though it came later in the prompt. When creating unlikely situations, extra emphasis helps.
If the image looks glitched and the guidance is set to 7, the negatives might be set too strongly. Try reducing their intensity.
Positives and Negatives were once the only way to steer the AI into getting what we wanted, but this isn’t necessary anymore. Use concepts instead (below) more examples
Concepts
Concepts are specialized AI models that generate specific things that cannot be well understood with prompting alone. Multiple concepts can be used together: Typically one Base model and 1-3 LoRas or Inversions are the most common use.
Model Family Our software supports two Stable Diffusion families at this time: SD15 (older, trained at 512×512) and Stable Diffusion XL, which is natively 1024×1024. Staying close to these resolutions will produce the best results (and avoid duplicate limbs, etc)
The most important thing to note is that Families are not compatible with each other. An SDXL base cannot be used with an SD15 Lora, and vice-versa.
Types of Concepts
Base models are also called “full models” which most strongly determine the style of the image. LoRas and Textual Inversions are smaller models for fine controls. These are small files with specificity over one subject, typically a person or a pose. Inpainting models are only used by the Inpaint and Outpaint tools, and should not be used for rendering or other purposes.
Special concept Tags
The concepts system is organized by tags, with a wide range of topics from animals to poses.
There are some special tags called Types, which tell you how the model behaves. There are also replacements for Positives and Negative Prompts called Detailers and Negatives. When using the Negative concept type, remember to also set the weight as a negative.
Models with fast-sounding names like “Hyper” and “Turbo” can render images quickly with low parameters, explained below in Guidance / CFG.
Blending multiple concepts: Use Weights
The sliders that appear next to concepts are called Weights. A base model is like the paint canvas: it always has 100% weight. The supporting smaller models can be adjusted between a weight of (negative) -2 and 2 (max). A weight between 0.4 – 0.7 typically works best when less than 3 models or less are selected. Adjust them for balance.
When using a negative model, slide the weight to the negative, typically -1 or -2.
Always use at least one base
Although more than one base models can be added (for ease of use), remember to delete the one that you don’t want, as only one base will work. Base models cannot be blended together, but LoRas and Inversions can. Also, be careful not to choose a LoRa or TI as a replacement for your Base/Full Model, as those need to work together for best results.
Troubleshooting
Using many models can be like playing many songs at the same time: if they are all the same volume (weight) it’s hard to pick out anything.
If the images appear overly blocky or pixelated, make sure you have a base model and your guidance is set to 7 or lower, and your positives and negatives are not too strong. Try adjusting your weights to find the best balance. Learn more about Guidance and Parameters in the guide below.
Parameters
Resolution: Width and Height
AI model photos are “trained” at a specific size, so creating images close to those sizes produces the best results. When we try to go too large too soon, it may result in glitches (twins, extra limbs).
Guidelines:
Stable Diffusion XL models: Start at 1024×1024, and it’s usually safe below 1400×1400.
Stable Diffusion 1.5 was trained at 512×512, so the upper limits are 768×768. A few advanced models like Photon will perform at 960×576. more SD15 size tips
You can always upscale on a second step close to 4K, see the Facelift upscaler info below.
Seed
An arbitrary number used to initialize the image generation process. This isn’t a specific image (it’s not like a photo ID in the database), but more of a general marker. The purpose of a seed is to help repeat an image prompt. Seed was originally the best way to maintain persistent characters, but that has been superseded by the Concepts system.
To repeat an image: the Seed, Guidance, Sampler, Concepts and prompt should be the same.
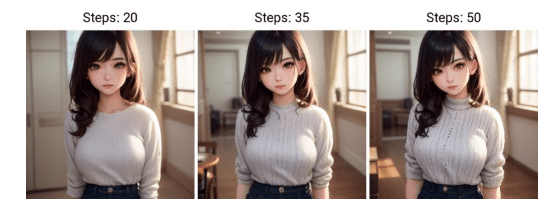
Steps
The number of iterations the AI takes to refine the image, with more steps generally leading to higher quality. Of course, the higher step count results in slower processing.
The old advice was to work above 35 steps or higher to achieve quality, however this is no longer always the case, as newer high-efficiency models can create a stunning image with only 4 steps!
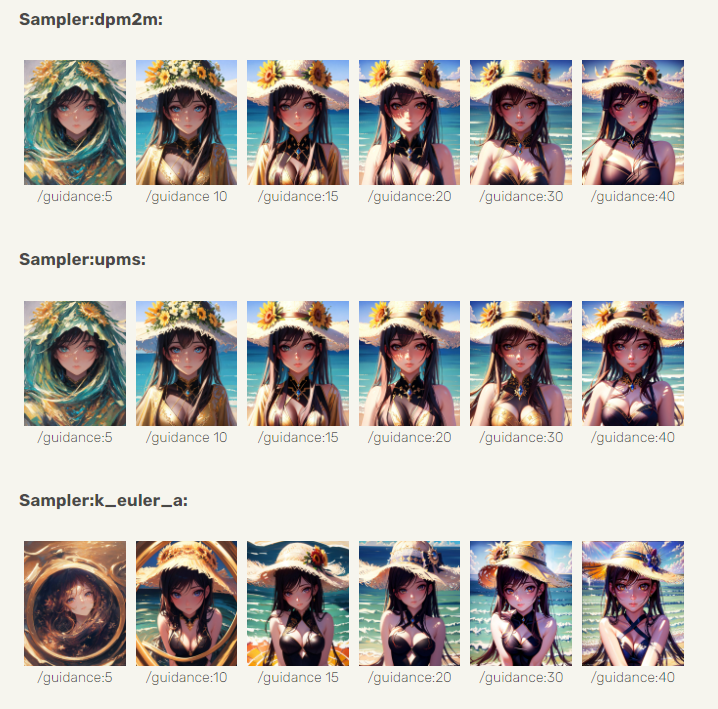
Guidance (CFG)
The (classifier-free) Guidance scale is a parameter that controls how closely the AI follows the prompt. The range is handled by the Sampler, and is typically 0-30. We recommend starting at 7, which is suitable for illustration and realism.
Creativity vs. Sharpness
Higher values can result in better adherence to the prompt and sharper images. Lower values allow the AI more freedom to fill in the blanks, perhaps resulting in a more “creative” image. When the AI isn’t allowed enough guidance, missing blocks or colorful jibberish may appear, so try to strike a balance.
Consider the differences in this image:
Exceptions to the rule
Typical models follow this guidance and step pattern, but newer high efficiency models require far less guidance to function in the same way, between 1.5 – 2.5. This is explained below:
High Efficiency Models
Low Steps, Low Guidance
Most concepts require a guidance of 7 and 35+ steps to generate a great image. This is changing as higher efficiency models have arrived.
These models can create images in 1/4 of the time, only requiring 4-12 steps with lower guidance. You can find them tagged as Turbo, Hyper, LCM, and Lightning in the concepts system, and they’re compatible with classic models. You can use them alongside Loras and Inversions of the same model family. The SDXL family has the biggest selection (use the pulldown menu, far right).
Some of our favorite Lightning models are and which look great with a guidance of 2, steps between 4-12, and Refiner (no fix) turned off. Polish it off with a good negative like [[]]. Follow it up with an upscale, and the effects are stunning!
Look into the notes of these special model types for more details on how to use them, like Aetherverse-XL (pictured below), with a guidance of 2.5 and 8 steps as pictured below.
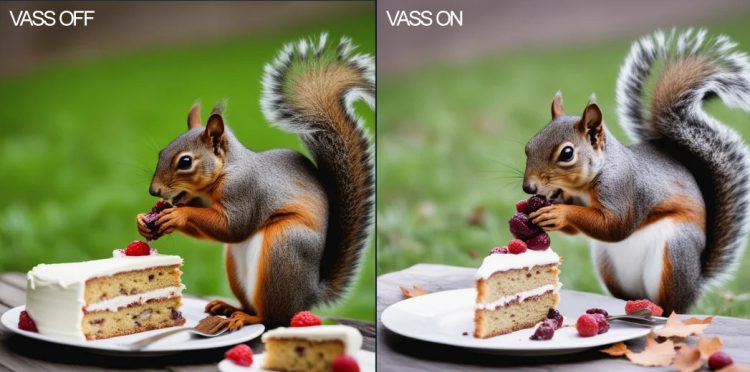
VASS (SDXL only)
Vass is an HDR mode for SDXL, which may also improve composition and reduce color saturation. Some prefer it, others may not. If the image looks too colorful, try it without Refiner (NoFix)
Long Prompt Weights (experimental)
You can write longer positive and negative prompts when it’s turned on. Watch a video demo.
Example:
((high quality, masterpiece, masterwork)) A wizard browsing through a magical marketplace with a mystical air around him. He has pointy ears, spectacles perched precariously on his nose, and a wand twirling in hsi hand. His robes are adorned with intricate patterns and patterns of magic dust. There is a bubbling magical cauldron, and mythical creatures peeking around from behind him.
This is a prompt rebalancing utility that allows the prompt comprehension to go much further than 77 tokens, improving prompt comprehension overall. Of course, we would set this as the norm if were not for some unfortunate tradeoffs:
Limitations
Requires a lower guidance for best results, around 7 or less
LPW Should not be combined with very heavy positive or negative prompting
(((((This will break)))))
[[[[so will this]]]]
Does not work well with Loras or Inversion concepts
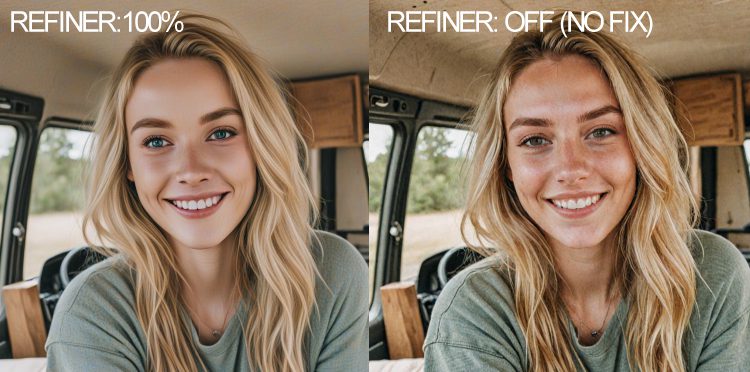
The refiner is a noise removal and smoothing technique, recommended for paintings and illustrations. It creates smoother images with cleaner colors. However, sometimes is the opposite of what you want. For realistic images, turning off the refiner will result in more color and details, as shown below. You can then upscale the image to reduce the noise and boost the resolution.
Samplers
A sampler (also called a scheduler) is algorithm that determines how the AI should solve your prompt with the given parameters. The “best” sampler is highly subjective. More info and comparison images
The one exception is the LCM sampler, which is specifically used for rendering in low guidance and low steps.
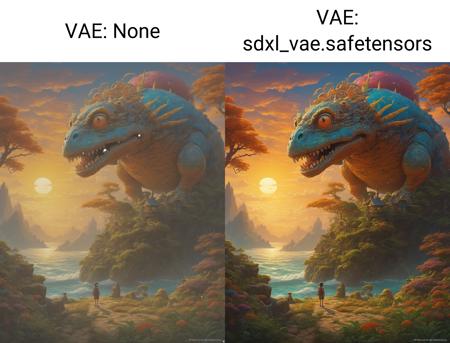
VAE
VAE stands for Variational AutoEncoder, a part of the software that has a lot of influence on how colorful the image is. For SDXL, there is only one fantastic VAE at this time.
For SD15, we stock many options. Here’s one person’s unscientific opinion on what the differences are:
kofi2 — very colorful and saturated
blessed2 — less saturated than kofi2
anything45 — less saturated than blessed2
orange — medium saturation, punchy greens
pastel — vivid colors, like old Dutch masters
ft-mse-840000-ema-pruned – great for realism
Troubleshooting: Some VAE are incompatible with some base models. This will result in two glitches: Neon green light leaks (or) a black square, so try another VAE if the image if that happens.
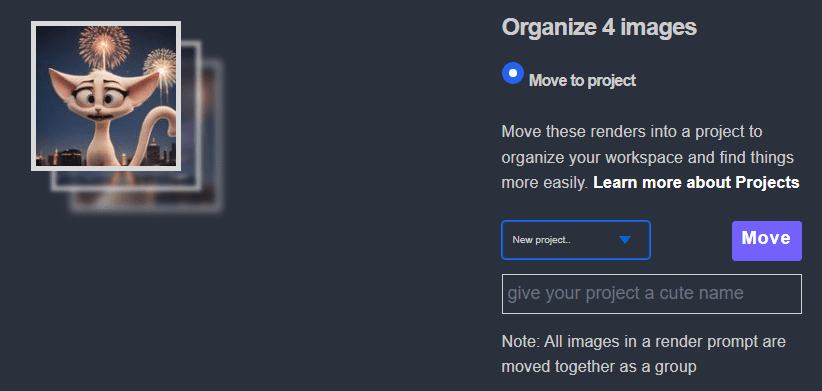
Projects
You can render images directly into project folders. Here’s how to set this up:
The project is now ready to go. You might need to refresh Stable2go one more time for the folder name to appear.
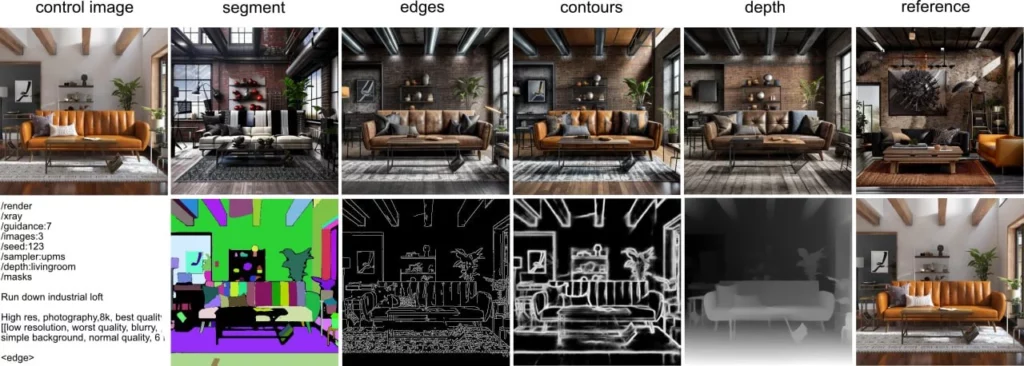
ControlNet
ControlNet is similar to a stencil tool, with many modes. You can provide a starting image as the stencil, choose a mode, and change that source image’s look with a positive and negative prompt. You can control the effect with the weight slider. Input images between 768×768 or 1400×1400 work best.
We’ve just scratched the surface of what Stable2go can do. You can also add arbitrary commands from PirateDiffusion’s Cheat Sheet as well. A popular one is /clipskip:2
There are many options supported like FreeU, Adetailer, Karras, etc. The rabbit hole goes deep!
Translations & Limitations
You can prompt in any language by adding /translate in the positive prompt or other field. The system supports 50 languages. Of course, some regional slang may be misunderstood, so prompt as literally and by the book as possible when using the translation feature. For example, “cubito de hielo” could mean small ice cube or a small pail bucket of ice in Spanish, depending on the region and contextual nuance. To be fair, this can also happen in English (a polar hunting may put a firearm on it!) To avoid this from happening, use multiple words in your positive and negative prompt to help zero it in.
Equivalent Raw Prompt
This is a debugging message that shows you the full prompt being sent to the AI
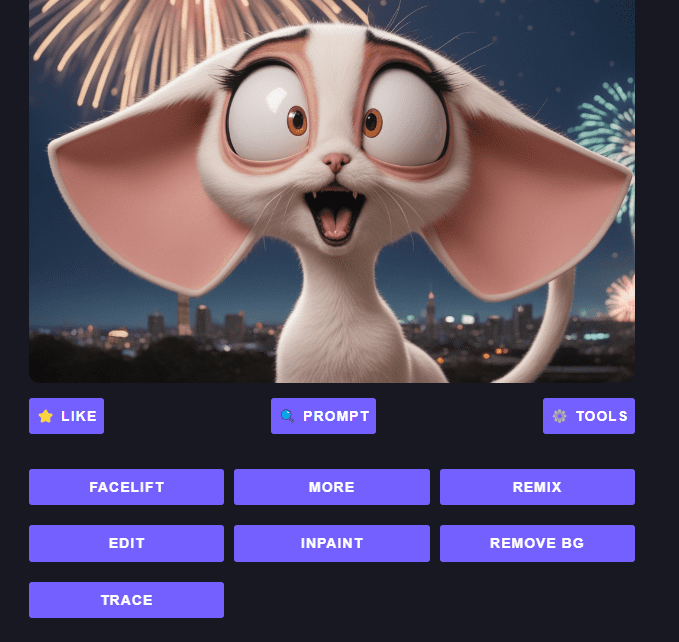
Tools
Refine your images
After the image is created, click into it to reveal the tools menu. These are handy for creating spot fixes.
Upscale with the Facelift tool
Boost Pixels and Details
Increase the details of an image by 4x, as well as remove lines and blemishes from photographs, similar to the “beauty” mode on smartphone cameras. Modes for realistic photos and artwork. more info
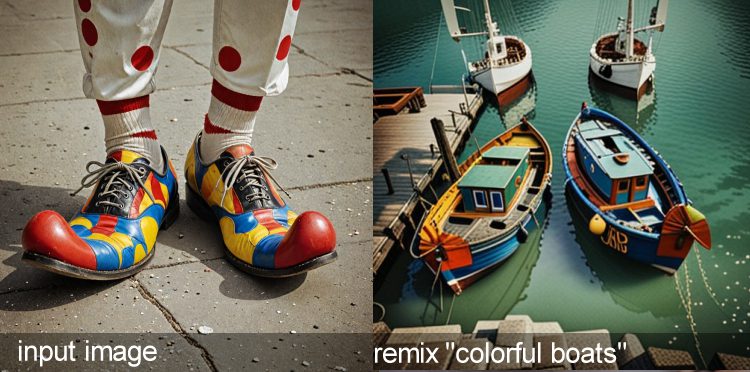
Remix tool
Image-to-Image transformations
The remix tool is magical. An uploaded or rendered image can be transformed in the art style of a concept with the Remix tool. You can also use input photos as reference pictures to go in dramatically different subject matter changes.
Style Transfer and Creative “upscale”
You can also use the remix tool to re-interpret low resolution images into something new, such as turning low resolution video game photos into a modern realistic images, or turn yourself into a caricature or anime illustration. This video shows you how:
More tool
The More tool creates variations of the same image
To see the same subject in slightly different variations, use the more tool.
What’s happening under the hood: The seed value is increasing and the guidance is randomized, while retaining your original prompt. Limitations: It may overdo guidance when using Efficient models.
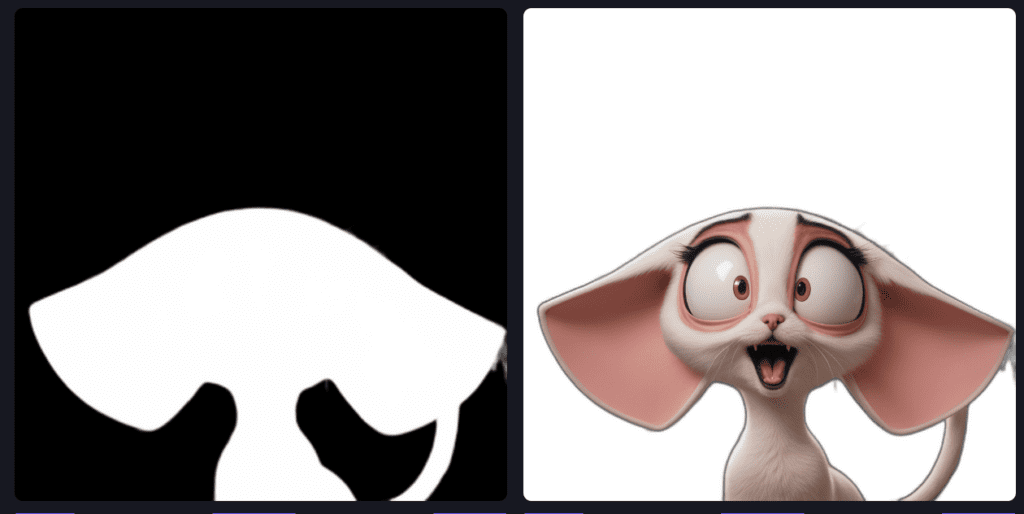
Inpainting tool
AKA Generative Fill
Inpainting is a masking tool that allows you to draw a mask around an area and prompt something new into it, or remove the object like a magic eraser. The inpaint tool has its own positive and negative prompt box, which also accepts trigger codes for concepts.
Note: Our software has been updated since this video, but the same principles still apply.
Remove BG tool
Lightning fast background zapping
The background removal tool is an easy, one-step solution to eliminating everything behind the subject. Images at or around 800×800 work best. You can also use the inpainting tool (above) to mask and prompt a new background into place.
Build your own Tools, with no code
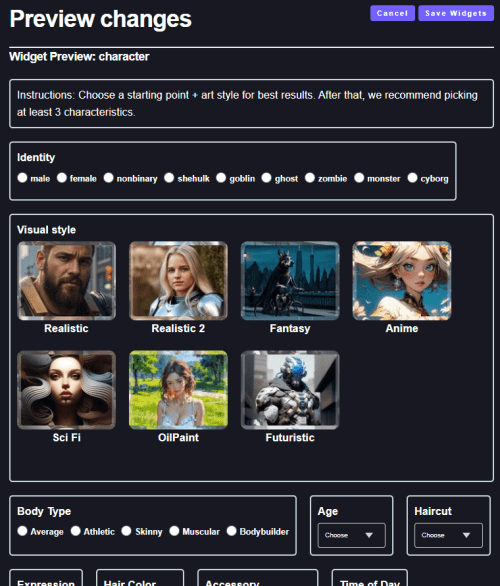
Once you’ve mastered the basics, you can create your own WebUI(s).